Portfolio
Experimenting with Raster Images in the HTML5 Canvas
- Client Implementation
- HTML5
- CSS
- JQuery
- Javascript
- Image Processing
Problem to be solved
I wanted to experiment with the HTML5 Canvas element. I often write small programs when I want to experiment with something, or learn something.
Solution
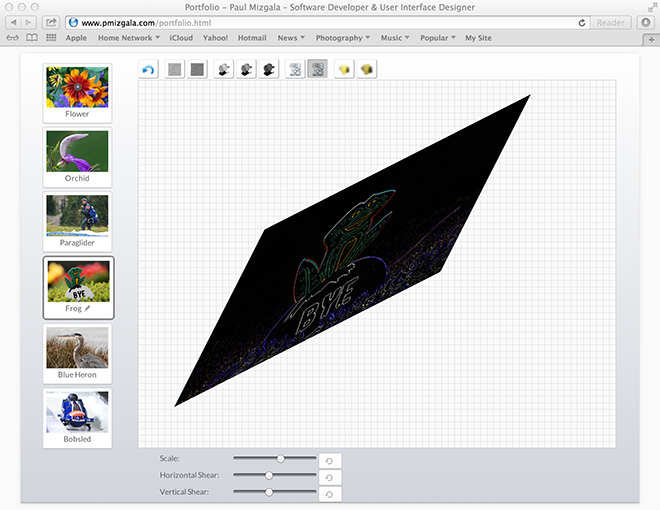
As an enthusiastic amateur photographer, I decided to design and implement a small javascript program to manipulate some of the images I have taken using the HTML5 Canvas element.
Details
- A thumbnail image is selected on the left-hand side of the screen to populate the canvas.
- Filters are applied to the canvas image by selecting filters from the tool bar above the canvas image.
- Scaling and shearing is applied to the canvas image by manipulating the slider controls below the canvas image.
- The image can be repositioned in the canvas by dragging the image around with a mouse.
Notes on this program
- All image filters were implemented in javascript via convolution rather than through CSS image filters.
- Image manipulations such as scaling and shearing were implemented via the Canvas' transform method.
- This program is available as an inline demo. Currently, this program does not support mobile devices, and requires a javascript enabled browser. If you are interested in trying this program out, please navigate to this page with a desktop/laptop javascript enabled browser.
- Please note that I am not an artist, so my tool bar images are probably not that wonderful.
-
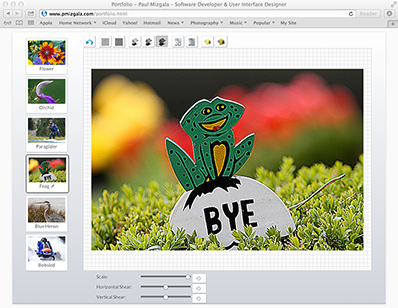
 Original Image
Click to enlarge now
Original Image
Click to enlarge now
-
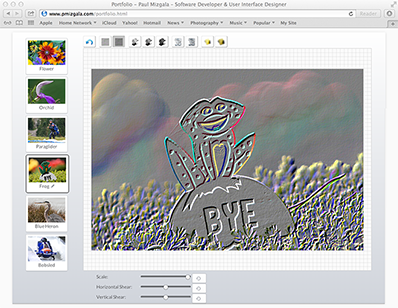 Emboss Filter
Click to enlarge now
Emboss Filter
Click to enlarge now
-
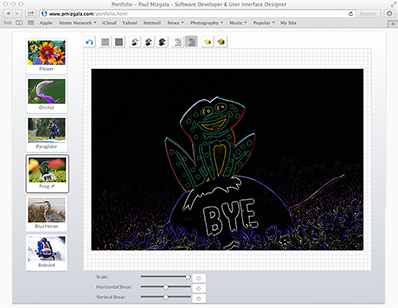 Find Edges Filter
Click to enlarge now
Find Edges Filter
Click to enlarge now
-
 Medium Blur Filter
Click to enlarge now
Medium Blur Filter
Click to enlarge now
-
 Sharpen Filter
Click to enlarge now
Sharpen Filter
Click to enlarge now
-
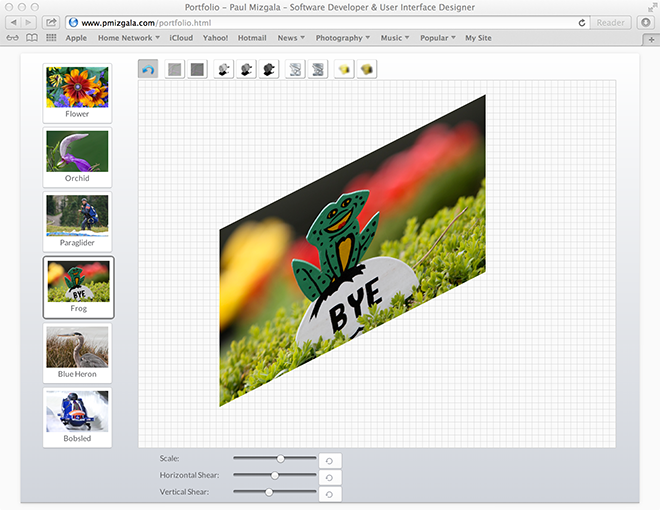
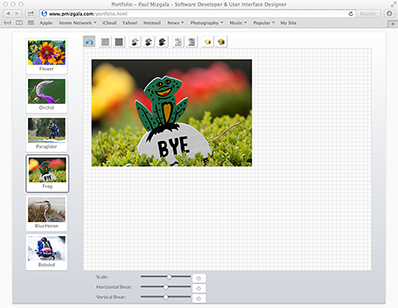 Scaling and repositioning the image
Click to enlarge now
Scaling and repositioning the image
Click to enlarge now
-
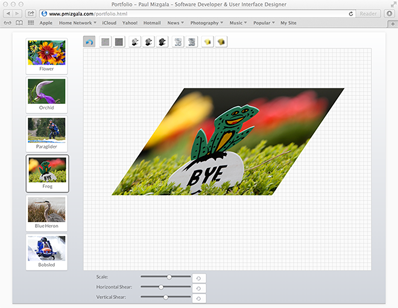 Horizontal Shear
Click to enlarge now
Horizontal Shear
Click to enlarge now
-
 Vertical Shear
Click to enlarge now
Vertical Shear
Click to enlarge now
-
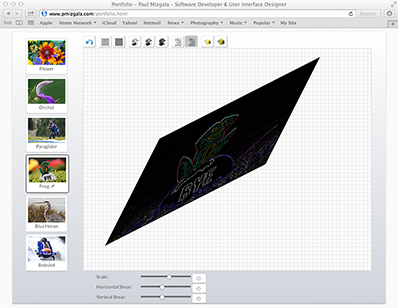 Horizontal/Vertical Shear with Find Edges
Click to enlarge now
Horizontal/Vertical Shear with Find Edges
Click to enlarge now
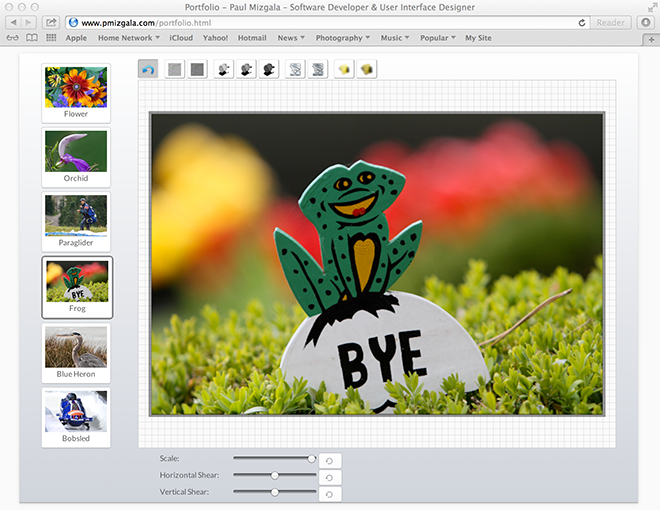 Original Image
 Emboss Filter
 Find Edges Filter
 Medium Blur Filter
 Sharpen Filter
 Scaling and repositioning the image
 Horizontal Shear
 Vertical Shear
 Horizontal/Vertical Shear with Find Edges
Experimenting with Raster Images in the HTML5 Canvas
- Client Implementation
- HTML5
- CSS
- JQuery
- Javascript
- Image Processing
Problem to be solved
I wanted to experiment with the HTML5 Canvas element. I often write small programs when I want to experiment with something, or learn something.
Solution
As an enthusiastic amateur photographer, I decided to design and implement a small program to manipulate some of the images I have taken using the HTML5 Canvas element.
Details
- This is an inline demo. Feel free to try it out.
- A thumbnail image is selected on the left-hand side of the screen to populate the canvas.
- Filters are applied to the canvas image by selecting filters from the tool bar above the canvas image.
- Scaling and shearing is applied to the canvas image by manipulating the slider controls below the canvas image.
- The image can be repositioned in the canvas by dragging the image around with a mouse.
- The effects of the filter are not cumulative, as combining many of these filters does not produce a useful effect.
Notes on this program
- This is a work in progress. I plan to add additional features.
- All image filters were implemented in javascript via convolution rather than through CSS image filters.
- Image manipulations such as scaling and shearing were implemented via the Canvas' transform method.
- Please note that I am not an artist, so my tool bar images are probably not that wonderful.
 Flower
 Orchid
 Paraglider
 Frog
Frog
 Blue Heron
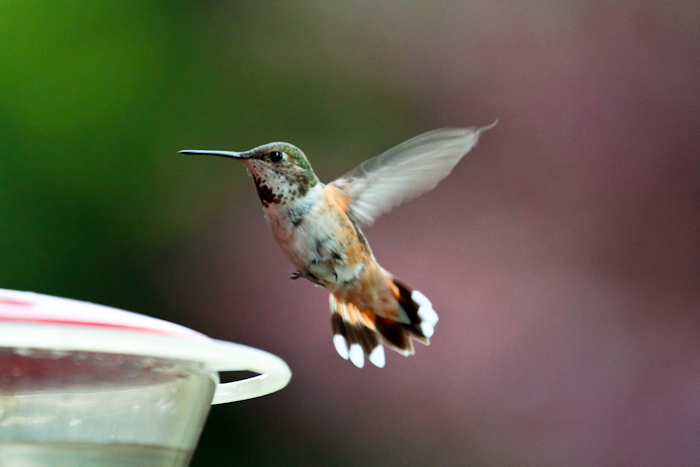 Hummingbird


KODAK RECIPE COLOR Profiler(KRCP)
- Feature Owner
- UI Designer
- Client implementation - Java, Swing
- Plumbing between the client and the color computation engine - Java & MATLAB
-
 Proof Condition Manager
Click to enlarge now
Proof Condition Manager
Click to enlarge now
-
 Proof Donor Order Editor
Click to enlarge now
Proof Donor Order Editor
Click to enlarge now
-
 Color Measurement Device
Click to enlarge now
Color Measurement Device
Click to enlarge now
-
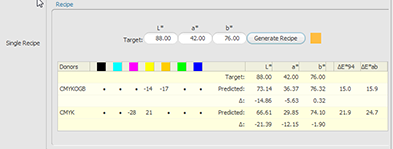 Generate Single Recipe
Click to enlarge now
Generate Single Recipe
Click to enlarge now
-
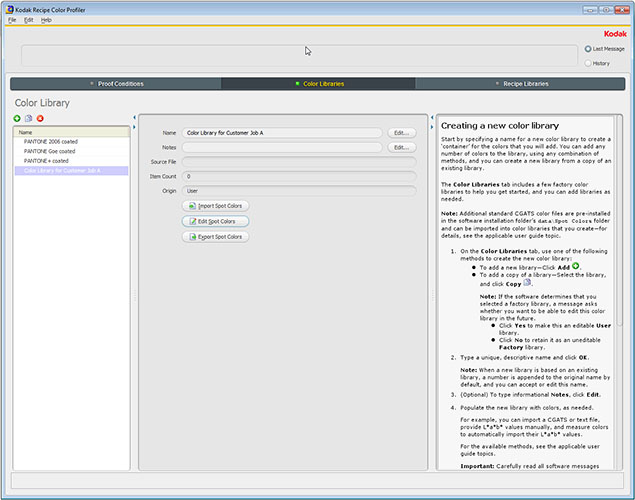 Color Library Manager
Click to enlarge now
Color Library Manager
Click to enlarge now
-
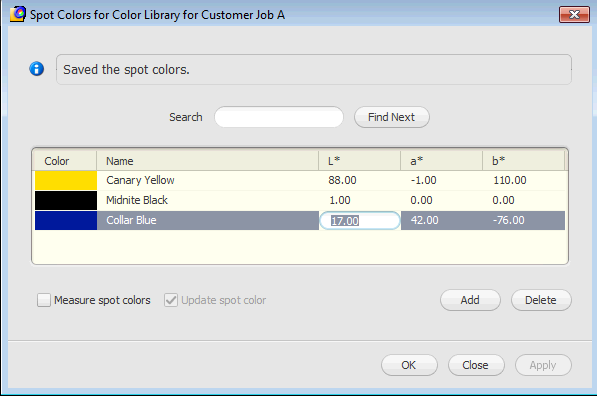 Color Library Editor
Click to enlarge now
Color Library Editor
Click to enlarge now
-
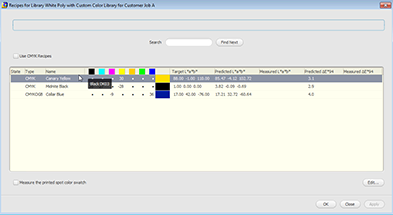 Recipe Library Editor
Click to enlarge now
Recipe Library Editor
Click to enlarge now
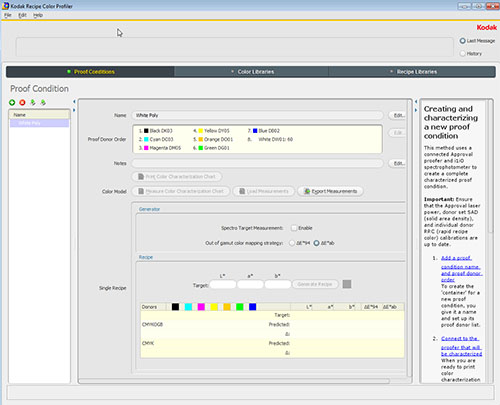
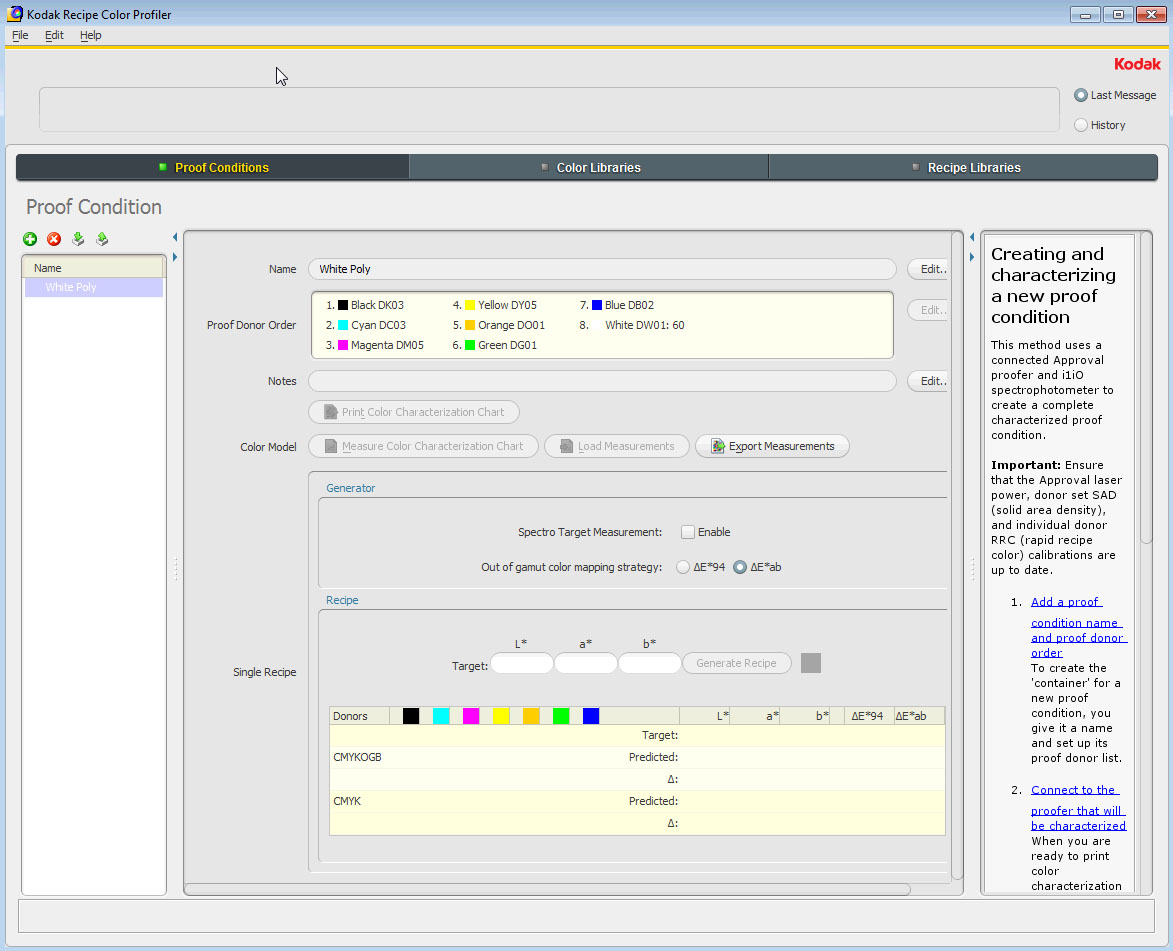 Proof Condition Manager
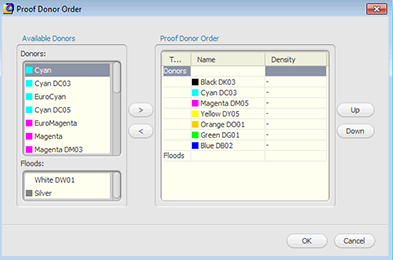
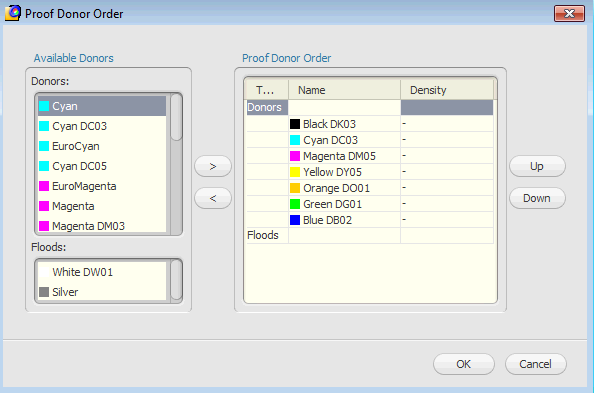 Proof Donor Order Editor
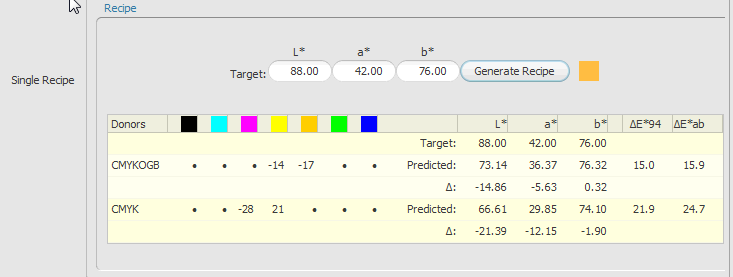 Generate Single Recipe
 Color Library Manager
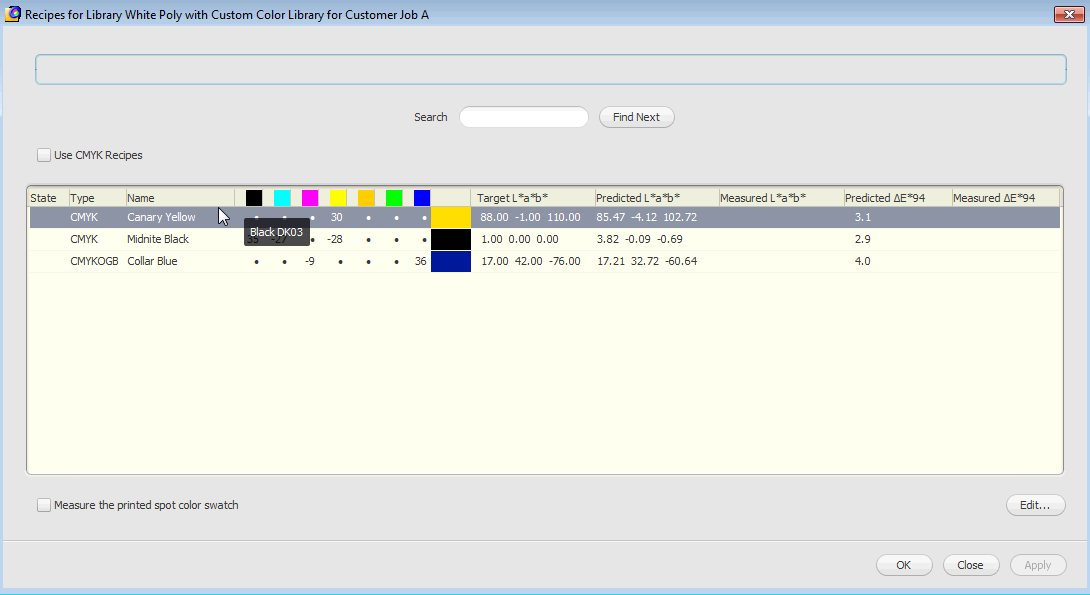 Recipe Library Editor
Problem to be solved
Customers using the KODAK APPROVAL Digital Color Imaging System must create and maintain a large number of Color Recipes. A Color Recipe is a formula that contains the amount of one or more colorants needed to reproduce a particular color on the KODAK APPROVAL. Color Recipes are organized in Recipe Libraries.
Because creating Color Recipes manually is time consuming and very cumbersome, KODAK APPROVAL customers needed a way to automate the generation of accurate Color Recipes as well as manage those Color Recipes.
Solution
The KODAK RECIPE COLOR PROFILER(KRCP) application was conceived to generate and maintain these Color Recipes.
Details
- Single Recipes are generated based on a Proof Condition.
- Complete Recipe Libraries are automatically generated by mating a Proof Condition and a Color Library.
- A Proof Condition represents a particular substrate(material on which the image is applied), and a particular Proof Donor Order.
- A Proof Donor Order specifies which Donors(colorant) of several possible Donor sets are to be used and the order in which the specific Donors are to imaged.
- Typically, users will store and manage several Proof Conditions in KRCP, as Proof Conditions can be reused.
- When creating a Proof Condition, the user defines a Proof Donor Order.
- After defining a Proof Donor Order, color measurement data must be applied to the Proof Condition.
- Color measurement data is applied to a Proof Condition via a special color swatches chart that is imaged on the KODAK APPROVAL using the substrate of interest.
- The special color swatches chart is then measured with a color measuring device.
- The user is guided through the printing of the chart and the chart's measurement via a wizard.
- Once the measurements are complete, the measurements are applied to the Proof Condition and the Proof Condition is ready for use.
- Color Library management is supported in KRCP. There are several Color Libraries available commercially that may be imported into KRCP.
- Users may also define and manage their own Color Libraries in KRCP.
- Colors in a Color Library are defined in the L*a*b* color space which is device independent.
- Typically, users will store and manage several Color Libraries in KRCP, as they can be reused.
- After there is at least one Proof Conditon and one Color Library available, the user may generate a Recipe Library by mating a Proof Condition with a Color Library.
- After Recipe Libraries are generated, Recipe Libraries can be associated with print jobs on the KODAK APPROVAL.
My Role
- As feature owner, I was involved in the complete development lifecycle of this project.
- Collaborated with domain experts to find out what was needed.
- Defined the requirements
- Collaborated with a Color Scientist, coordinated tasks with other developers, and collaborated with the QA team.
- Ensured all that needed to get done got done.
- Designed the User Interface, and implemented much of the client.
- Designed and implemented the plumbing between the client and the color computation engine.
Selective Convert to Process
- UI Designer
- Client implementation - Java, Swing
 Separations Editor
 Mapping and Conversion choices
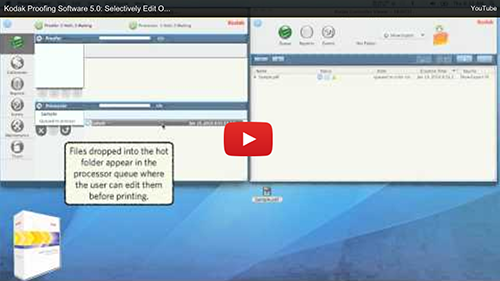
 YouTube Demo
Problem to be solved
KODAK Proofing Software(KPS) customers wanted to manipulate Color Separations for a print job after the print job was submitted to KPS.
Solution
Design and implement a dialog that can be invoked on a paused job before the job enters the print queue.
Details
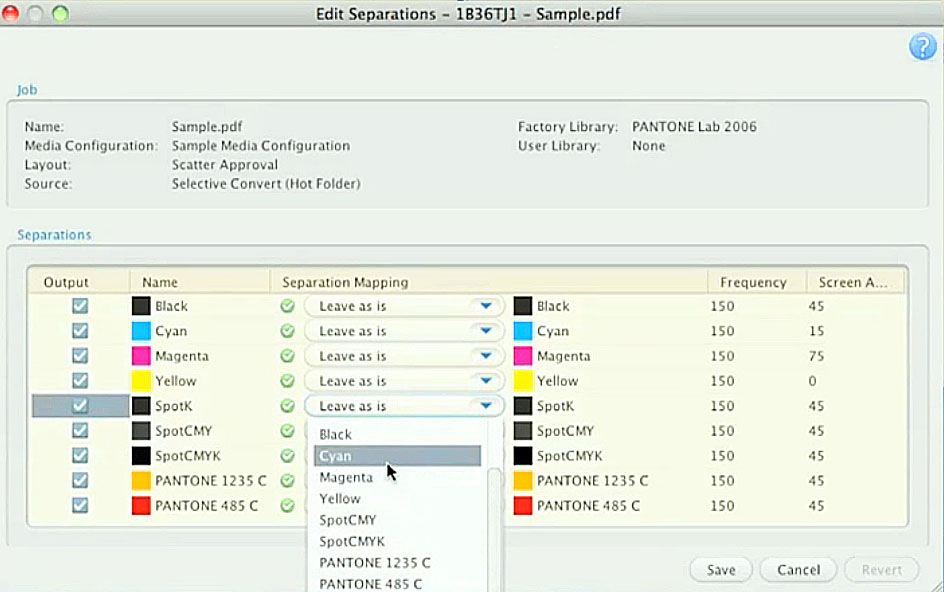
A job is paused before it enters the print queue. A dialog representing the job's Color Separations can be launched by the user.- Users can suppress the output of one or more Color Separations of a print job.
- Color Separations can be remapped to other Color Separations of a print job.
- Colors from several Color Libraries can be assigned to the Color Separations of the job.
- Spot Colors can be converted to Process Colors during the processing of a print job. A Spot Color is a special color that is reproduced using a single ink in its own single separation. A Process Color is reproduced by mixing various combinations of Cyan, Magenta, Yellow, and Black. Because a spot color uses its own ink and color separation, its color will be reproduced more accurately, however it is more costly.
My Role
- Designed the User Interface.
- Implemented the client.
Notes on the YouTube Demo Video
- Although several configuration steps such as configuring a Hot Folder are demonstrated in the video, these steps are not performed for every job. Typically users have several Hot Folders configured up front for daily use.
- As a side note, I implemented the Drag and Drop functionality shown in the video.
Note the prominence of the Selective Convert to Process feature on page 3 of the KPS Brochure.
Show Export
- Feature Owner
- UI Designer
- Client implementation - Java, Swing
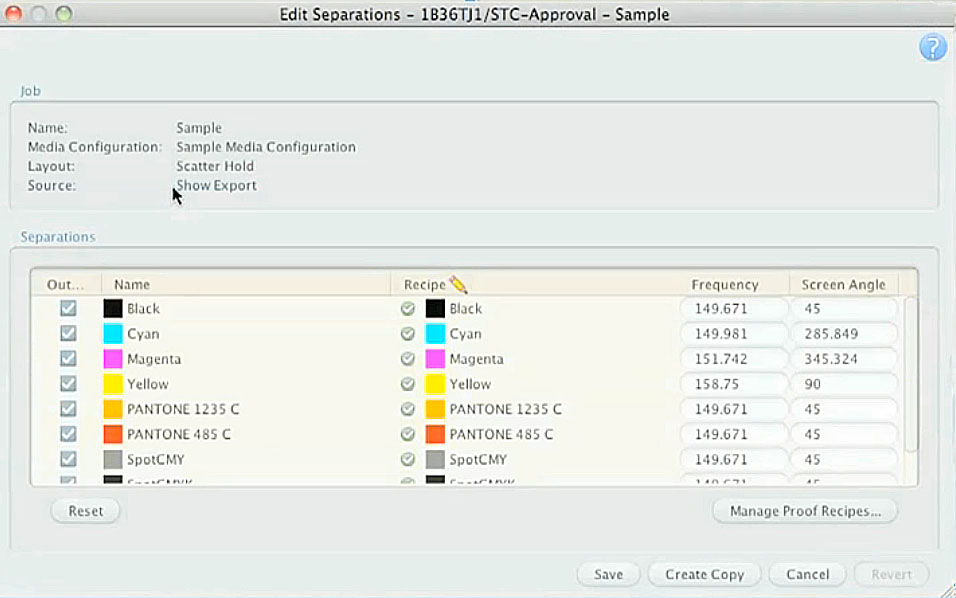 Separations Editor
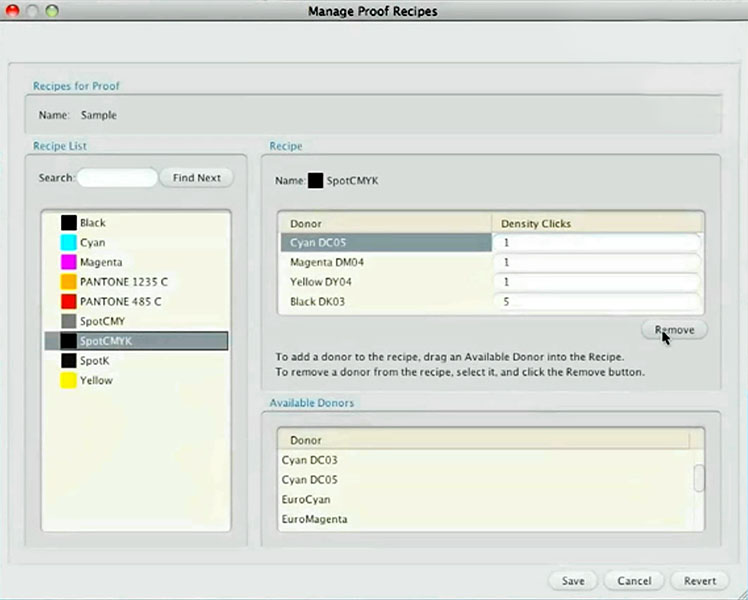 Recipe Editor
 YouTube Demo
Problem to be solved
- KODAK APPROVAL Digital Color Imaging System using KODAK Proofing Software’s (KPS), wanted to manipulate a print job's Color Separations and its Colors, after the job enters the print queue.
- Users wanted to be able to make these changes iteratively. For example, make some changes, print the job and examine the output, make some other changes, print the job.
Solution
Design and implement a dialog to manipulate the Color Separations, and a dialog to edit Colors.
Details
A job is paused in the print queue. A dialog representing the paused job's Color Separations can be launched.- Users can suppress the output of one or more color separations.
- If after a job enters the queue and a Color Recipe is not available in any of the Color Recipe Libraries associated with a print job, the user may add the color Recipe to the Color Library “on the fly”. Once the user adds the Color Recipe to an appropriate Color Library, the Color Library will be assigned to the appropriate Color Separation.
- Users may edit any Color Recipe associated with the print job. All color Recipe editing is within the print job’s scope.
- The job can be tweaked iteratively. Users may tweak the print job, then send a copy of the tweaked print job to the KODAK APPROVAL. The user can then review the resulting hard copy. If the user would like to perform more tweaks, the user can go back to Show Export and perform more tweaks. It is not necessary to resubmit the print job.
My Role
- As feature owner, I was involved in the complete development lifecycle of this project.
- Collaborated with domain experts to find out what was needed.
- Defined the requirements.
- coordinated tasks with other developers.
- Collaborated with the QA team.
- Ensured all that needed to get done got done.
- Designed the User Interface.
- Reviewed the User Interface design with customers.
- Implemented the client.
Notes on the YouTube Demo Video
- Although several configuration steps such as configuring a Layout are demonstrated in the video, these steps are not performed for every job. Typically users have several Layouts configured up front for daily use.
- I implemented the Drag and Drop functionality shown in the video. Before this Drag and Drop functionality was available, users had to submit jobs to the Hot Folder via the file system.
Customer Synchronization
- UI Designer
- Initial Client implementation - Java, GWT, AJAX
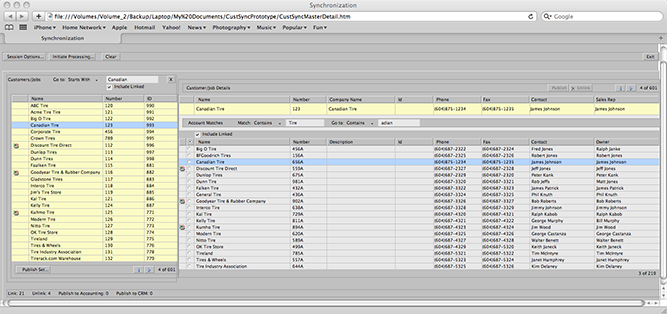 Customer Synchronization
Introduction
- Customer Synchronization was an administrative tool for Salescentrix.com’s AccountDynamics product.
- AccountDynamics was a subscription-based web SAAS product that performed bi-directional data synchronization between Salesforce.com and QuickBooks Online data. Accounts that were created/edited in QuickBooks would be synchronized with the corresponding accounts in SalesForce.com. Accounts that are created/edited in Salesforce.com would be synchronized with corresponding QuickBooks accounts.
Problem to be solved
- In order to synchronize data between Salesforce.com and Quickbooks, AccountDynamics maintained links between the two data stores.
- New customers that already had both Saleforce.com and Quickbooks data stores needed to have these links set-up before using AccountDynamics.
Solution
This project was to have two phases. For phase one:- Create an AJAX web-based application that assists in the setup of these links.
- Allow the user to navigate the Salesforce.com accounts with both automated searches and manual searches for the corresponding QuickBooks account. Provide a link command
- Allow the user to navigate the Quickbooks accounts with both automated searches and manual searches for the corresponding Salesforce.com account. Provide a link command
For phase two, we wanted to supply more automation for the creation of these links. Unfortunately Salescentrix.com went out of business before we had a chance to design and implement on to phase two.
Details
- The user chooses to navigate either via the Quickbooks accounts or via Salesforce.com accounts.
- In the left-hand side pane is a navigation pane where the user is presented with a list of accounts depending on their navigation choice. The user may filter and search this list of accounts.
- The user selects one of the accounts in the navigation pane.
- In the right-hand side linking pane, the user is presented with a list of corresponding accounts for linking.
- In the right-hand side linking pane the user may choose an UNFILTERED list of ALL corresponding accounts.
- In the right-hand side linking pane the user may choose a FILTERED list of all corresponding accounts. Various filters were provided.
- In the right-hand side linking pane the user may choose an AUTOMATIC FILTER whose results represented the most likely choices for linking.
- The right-hand side linking pane provides searching.
My Role
- Designed the User Interface
- Implemented the client.
Notes
This tool was a lot of fun to design and implement.- At the time (late 2006, early 2007) GWT was new.
- I had been designing and developing web-applications since 2001 using technologies such as JSP and DTML.
- Before GWT, DHTML could be a frustrating as there were many javascript incompatibilities among the various browsers. GWT did a reasonable job of doing this work for you.
Magellan by Mercury Scheduling Systems
- UI Designer
- Client implementation - C++
 Magellan CD/DVD Cover
Problem to be solved
- In the world of airlines, planned crew schedules can be disrupted by unexpected events such as bad weather, aircraft mechanical problems, flight delays, and last minute crew illnesseses.
- During the “day of operations”, these disruptions must be resolved quickly via rescheduling to meet airline crew scheduling needs.
Solution
Design and develop Magellan, a real-time “day of operations” airline crew scheduling system to manage disruptions to an airline’s planned crew schedule.
Details
I do not have any screen captures of Magellan, instead I will describe the approach used to design the User Interface.
In summary, these are the steps we took to design the Magellan User Interface:
- Understand crew scheduling and get to know the users.
- Define views and a navigation map describing how the user navigates between the views and the data they bring with them when navigating to the views.
- Divide the views into sections.
- Define the detail that will appear in the various sections of the views.
- Define a tight set of primitive commands.
- Define dialogs that were needed.
- Refinements.
Please note, although I am describing several steps in the design of the Magellan user-interface, there was a good deal of iteration between the various steps.
My Role
- Designed the User Interface
- Implemented the client.